Sunday, 29 November 2015

Validating Multiple Controls in VB.NET

If you have ever built a form in Visual Studio with say 10 textboxes, you then want to validate all 10 textboxes on a certain event, well naturally you could go through each one like so
If txtTextBox1.Text = "" then

End If

If txtTextBox1.Text = "" then

End If

If txtTextBox1.Text = "" then

End If
etc.......
But this leads to messy and tedious code so below is an example on how to loop through controls on a form and validate them on the way.
For Each ctrl As Control In Me.Controls
    If ctrl.Text = "" Then
        MessageBox.Show("Invalid input for " & ctrl.Name)
        Exit Sub
    End If
Next
Ok so this validates all the controls on the form which may not be what we are after so how about checking the type of the control inside the loop? This way we can validate only textboxes or only combo boxes as we need, but what if we only want to validate so many of our text boxes? Keep reading!
For Each ctrl As Control In Me.Controls
    If TypeOf ctrl Is TextBox Then
        If ctrl.Text = "" Then
            MessageBox.Show("Invalid input for " & ctrl.Name)
            Exit Sub
        End If
    End If
Next
So now we know how to check different types of controls but what if I have 6 Textfields that are string and then another 4 that are phone numbers or numeric values? Well if we name the controls correctly we could check against any control we like based on their name, this allows us to group controls for specific validation tasks.
        For Each ctrl As Control In Me.Controls
            If TypeOf ctrl Is TextBox Then
                'check if it should be string
                If ctrl.Name.StartsWith("txtString") Then
                    'check if its valid value
                    If ctrl.Text = "" Then
                        'if its blank exit sub
                        MessageBox.Show("Invalid Input")
                        Exit Sub
                    End If
                    'check if it should be numeric
                ElseIf ctrl.Name.StartsWith("txtInt") Then
                    'validate that it is numeric
                    If Not IsNumeric(ctrl.Text) Then
                        'if not show error and exit sub
                        MessageBox.Show("Please enter Numeric Values for Phone Numbers")
                        Exit Sub
                    End If
                End If

            End If
        Next
You can see that for controls where we want string values entering, we name them txtString and for controls where we want numeric values we name them txtInt. This is only a simple example and you could take it further by looking at the rest of the control name say txtStringAddress which would allow you to give more friendly error messages specific to the correct field.

If In Form textbox is within the Groupbox or Panal u can use like:


         For Each ctrl As Control In Me.Controls
                If CheckControlValidation(ctrl) = False Then
                    Exit Sub
                End If
         Next
 Private Function CheckControlValidation(ByVal cnt As Control) As Boolean
     Try
        If TypeOf cnt Is GroupBox  or  TypeOf cnt Is Panel Then
           For Each control As Control In cnt.Controls
                    'Loops through array of controls
              If TypeOf control Is TextBox Then
                   If control.Text = "" Then
                       MessageBox.Show("Invalid input for " & control.Name)
                       control.Focus()
                       Return False
                   End If
               End If
           Next

        ElseIf TypeOf cnt Is TextBox Then

          'check if it should be string
          If cnt.Name.StartsWith("txtString") Then
                 'check if its valid value
              If cnt.Text = "" Then
                'if its blank exit sub
                  MessageBox.Show("Invalid Input")
                  cnt.Focus()
                  Return False
                  End If
            'check if it should be numeric
           ElseIf cnt.Name.StartsWith("txtInt") Then
                    'validate that it is numeric
            If Not IsNumeric(cnt.Text) Then
                        'if not show error and exit sub
               MessageBox.Show("Please enter Numeric Values for Phone Numbers")
               cnt.Focus()
               Return False
            End If
          End If
       End If
       Return True
            
   Catch ex As Exception
            MbErr(ex)
    End Try
End Function
Thank You...

Add Dynamic TextBox, Label and Button controls with TextChanged and Click event handlers in Windows Forms (WinForms) Application

In this article I will explain how to add dynamic controls like Label, TextBox, Button, etc. to Windows Forms Application on click of a Button.
I will here also explain how we can attach event handler to various dynamically added controls like TextBox, Button, etc.

Form Layout
The form layout consists of a Button and a Panel control to add dynamic controls within it.


Namespaces
You will need to import the following namespaces.
C#
using System.Linq;
using System.Drawing;

VB.Net
Imports System.Linq
Imports System.Drawing


Dynamically adding Windows Label Control
Firstly we need to create a new object of the Label control and then count of the Label controls is determined, Count is useful to give number incremented unique Ids to the controls as well as for setting location of the controls on the Windows Form so that controls don’t overlap each other. After the location, the remaining properties like Size, Name and Text are set. Finally the Label control is added to the Windows Forms Panel control.
C#
Label label = new Label();
int count = panel1.Controls.OfType<Label>().ToList().Count;
label.Location = new Point(10, (25 * count) + 2);
label.Size = new Size(40, 20);
label.Name = "label_" + (count + 1);
label.Text = "label " + (count + 1);
panel1.Controls.Add(label);

VB.Net
Dim label As New Label()
Dim count As Integer = panel1.Controls.OfType(Of Label)().ToList().Count
label.Location = New Point(10, (25 * count) + 2)
label.Size = New Size(40, 20)
label.Name = "label_" & (count + 1)
label.Text = "label " & (count + 1)
panel1.Controls.Add(label)


Dynamically adding Windows TextBox Control
Similar to Label the TextBox control is dynamically added, the only difference here is the Text property and the dynamic TextChaned event handler.
C#
TextBox textbox = new TextBox();
count = panel1.Controls.OfType<TextBox>().ToList().Count;
textbox.Location = new System.Drawing.Point(60, 25 * count);
textbox.Size = new System.Drawing.Size(80, 20);
textbox.Name = "textbox_" + (count + 1);
textbox.TextChanged += new System.EventHandler(this.TextBox_Changed);
panel1.Controls.Add(textbox);

VB.Net
Dim textbox As New TextBox()
count = panel1.Controls.OfType(Of TextBox)().ToList().Count
textbox.Location = New System.Drawing.Point(60, 25 * count)
textbox.Size = New System.Drawing.Size(80, 20)
textbox.Name = "textbox_" & (count + 1)
AddHandler textbox.TextChanged, AddressOf TextBox_Changed
panel1.Controls.Add(textbox)

The following dynamic TextChanged event handler is raised when the text is changed inside the dynamic TextBox control.
C#
private void TextBox_Changed(object sender, EventArgs e)
{
    TextBox textbox = (sender as TextBox);
    MessageBox.Show(textbox.Name + " text changed. Value " + textbox.Text);
}

VB.Net
Private Sub TextBox_Changed(sender As Object, e As EventArgs)
    Dim textbox As TextBox = TryCast(sender, TextBox)
    MessageBox.Show(textbox.Name + " text changed. Value " + textbox.Text)
End Sub


Dynamically adding Windows Button Control
Similar to the TextBox control, here a Button control is dynamically added. The only difference is that here we have a dynamic Click event handler.
C#
Button button = new Button();
count = panel1.Controls.OfType<Button>().ToList().Count;
button.Location = new System.Drawing.Point(150, 25 * count);
button.Size = new System.Drawing.Size(60, 20);
button.Name = "button_" + (count + 1);
button.Text = "Button " + (count + 1);
button.Click += new System.EventHandler(this.Button_Click);
panel1.Controls.Add(button);

VB.Net
Dim button As New Button()
count = panel1.Controls.OfType(Of Button)().ToList().Count
button.Location = New System.Drawing.Point(150, 25 * count)
button.Size = New System.Drawing.Size(60, 20)
button.Name = "button_" & (count + 1)
button.Text = "Button " & (count + 1)
AddHandler button.Click, AddressOf Button_Click
panel1.Controls.Add(button)

The following dynamic Click event handler is raised when the dynamic TextBox control is clicked.
C#
private void Button_Click(object sender, EventArgs e)
{
    Button button = (sender as Button);
    MessageBox.Show(button.Name + " clicked");
}

VB.Net
Private Sub Button_Click(sender As Object, e As EventArgs)
    Dim button As Button = TryCast(sender, Button)
    MessageBox.Show(button.Name + " clicked")
End Sub


Friday, 27 November 2015

How To Create Setup File(.Exe File) From Windows Forms Application

This is the most important tutorial for creating the Setup File(.exe file) from windows forms application.You can easily install it any windows computers.You can use it only windows platform.
Now i am going to convert these windows forms application to the Setup File. Friends who have not read my previous tutorials please read  first this tutorial and download it, otherwise you will not understand correctly.For read the previous tutorial .
There are some steps to create Setup File From windows forms applications. please follow these steps carefully. 

Step1:-  First open your windows form application in your visual studio.Here i am using visual studio 2010 and my windows forms application Name is "test",which had made in previous tutorial.you can download it Clickdownload. 
Now i am going to open "test" application in visual studio 2010,my "test" application is on desktop. See it carefully and open your application together.


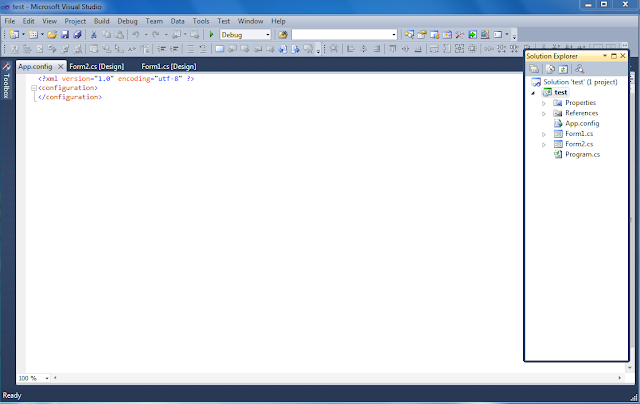
Step2:-  Now open "test" application in visual studio 2010,which is given below, follow it. Open visual studio 2010->File->Open project/solution->select the application "test"Folder_> click open.
See it:-


Step3:-  First see Form1.cs,Form2.cs and Solution Explorer window for remember previous post.
Form1.cs:->

Form2.cs:->


Step4:-> Now open solution explorer(if not open)->Add New Item->Select Application Configuration File->Click Add 
See it:->

See App.Config File:-It is used for creating connection to the database. It is optional.

Step5:- First create table in database,here i am already created "RAM"table in previous tutorial.See it:


  • write the connection string for creating the connection database table "RAM" in app.Config file.if You want to create otherwise  escape it
See it:->


Step6:-  Now this is main step to create the step. Open Solution Explorer->Click  on 'solution'test'('project)->Add New Project->Select other project types from left window->Select visual studio Installer->Select the setup Wizard-> write your setup name in below(mysetup)->click OK.


Step7:- 
  •  One wizard will be opened->click 'Next' Button.
See it:-


  • Select Radio button "Create a setup for a windows application" ->Click Next.
See it:-


  • Select "Primary output from text"-> Click Next.
See it:- 

  • Click Add Button->go your application folder,which you want to create setup.
See it:- 

  • Select the "App"File from your project ("test")-> click Open Button.
See it:- 
  • Now click Next Button.
See it:- 
  • Click Finish Button.
See it:- 


  • Now click Application Folder From left side window.
See it:-

  • Go right side window-> Right mouse click ->Add file->select icon file (extension . icon) , This icon will  show on Your desktop when you install the setup on computer.
See it:


  • Now create shortcut file of "Primary Output File" by l Right mouse click on  Primary Output File.
See it:


  • Now  change shortcut folder, here i have changed 'mysetup'.
See it: 


  • Now Right mouse click on ' mysetup' Shortcut and go property window.
See it:  

  • Click Icon and  select browse.
See it:  

  • Click Browse Button.
See it:  

  • Click Application Folder and select "mysetup"Icon file->click OK.
See it:  

  • Again select icon file and click OK button.
See it:  

  • Drag and drop 'mysetup shortcut' User's Desktop (left side window).
See it: 
  • Now again create shortcut primary output->rename it again mysetup ->  again add icon File from the mysetup property window as before we have added.
See it: 


  • Now Add New Folder in "User's program menu"(left side window) and  change Name it as setup->Now again Drag and Drop mysetup shortcut  to the setup.
See it:  

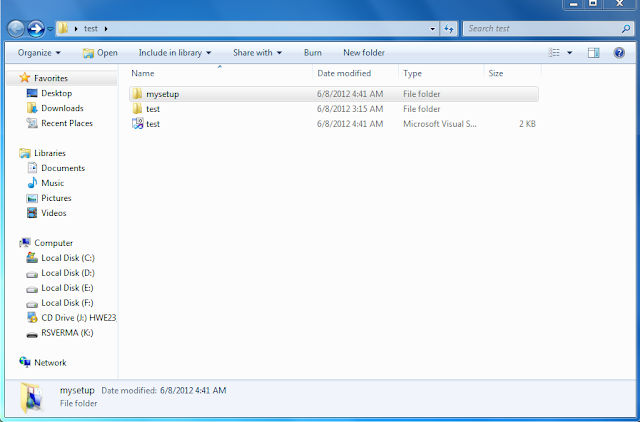
  • Now go "Solution Explorer window"-> Right mouse click on mysetup->Click Build. wait some time whenever setup is not successfully build-> Your setup is build successfully->Go and open your application Folder("test").
See it: 


  • click mysetup:-
See it:- 

  • ->Click Debug Folder.
See it:-    

Step8:- Before installing the setup you First install .NET FRAMEWORK 4.0 on your system,Click here for download . whenever you install this setup on your window (OS) and open it then you will see like this:-