Showing posts with label SQL. Show all posts

Wednesday, 13 September 2017

Introduction to Locking in SQL Server

Locking is a major part of every RDBMS and is important to know about. It is a database functionality which without a multi-user environment could not work. The main problem of locking is that in an essence it's a logical and not physical problem. This means that no amount of hardware will help you in the end. Yes you might cut execution times but this is only a virtual fix. In a heavy multi-user environment any logical problems will appear sooner or later.

Lock modes

All examples are run under the default READ COMMITED isolation level. Taken locks differ between isolation levels, however these examples are just to demonstrate the lock mode with an example. Here's a little explanation of the three columns from sys.dm_tran_locks used in the examples:

resource_type
This tells us what resource in the database the locks are being taken on.It can be one of these values:
DATABASE, FILE, OBJECT, PAGE, KEY, EXTENT, RID, APPLICATION, METADATA, HOBT, ALLOCATION_UNIT.

request_mode
This tells us the mode of our lock.

resource_descriptionThis shows a brief description of the resource. Usually holds the id of the page, object, file, row, etc. It isn't populated for every type of lock
The filter on resource_type <> 'DATABASE' just means that we don't want to see general shared locks taken on databases. These are always present. All shown outputs are from the sys.dm_tran_locks dynamic management view. In some examples it is truncated to display only locks relevant for the example. For full output you can run these yourself.

Shared locks (S)

Shared locks are held on data being read under the pessimistic concurrency model. While a shared lock is being held other transactions can read but can't modify locked data. After the locked data has been read the shared lock is released, unless the transaction is being run with the locking hint (READCOMMITTED, READCOMMITTEDLOCK) or under the isolation level equal or more restrictive than Repeatable Read. In the example you can't see the shared locks because they're taken for the duration of the select statement and are already released when we would select data from sys.dm_tran_locks. That is why an addition of WITH (HOLDLOCK) is needed to see the locks.

BEGIN TRAN

USE AdventureWorks

SELECT * FROM Person.Address WITH (HOLDLOCK)
WHERE AddressId = 2
 
SELECT resource_type, request_mode, resource_description
FROM   sys.dm_tran_locks
WHERE  resource_type <> 'DATABASE'

ROLLBACK


Update locks (U)

Update locks are a mix of shared and exclusive locks. When a DML statement is executed SQL Server has to find the data it wants to modify first, so to avoid lock conversion deadlocks an update lock is used. Only one update lock can be held on the data at one time, similar to an exclusive lock. But the difference here is that the update lock itself can't modify the underlying data. It has to be converted to an exclusive lock before the modification takes place. You can also force an update lock with the UPDLOCK hint:
BEGIN TRAN

USE AdventureWorks

SELECT * FROM Person.Address WITH (UPDLOCK)
WHERE AddressId < 2

SELECT resource_type, request_mode, resource_description
FROM   sys.dm_tran_locks
WHERE  resource_type <> 'DATABASE'

ROLLBACK


Exclusive locks (X)

Exclusive locks are used to lock data being modified by one transaction thus preventing modifications by other concurrent transactions. You can read data held by exclusive lock only by specifying a NOLOCK hint or using a read uncommitted isolation level. Because DML statements first need to read the data they want to modify you'll always find Exclusive locks accompanied by shared locks on that same data.
BEGIN TRAN

USE AdventureWorks

UPDATE Person.Address 
SET AddressLine2 = 'Test Address 2'
WHERE AddressId = 5

SELECT resource_type, request_mode, resource_description
FROM   sys.dm_tran_locks
WHERE  resource_type <> 'DATABASE'

ROLLBACK


Intent locks (I)

Intent locks are a means in which a transaction notifies other transaction that it is intending to lock the data. Thus the name. Their purpose is to assure proper data modification by preventing other transactions to acquire a lock on the object higher in lock hierarchy. What this means is that before you obtain a lock on the page or the row level an intent lock is set on the table. This prevents other transactions from putting exclusive locks on the table that would try to cancel the row/page lock. In the example we can see the intent exclusive locks being placed on the page and the table where the key is to protect the data from being locked by other transactions.
BEGIN TRAN

USE AdventureWorks

UPDATE TOP(5) Person.Address 
SET AddressLine2 = 'Test Address 2'
WHERE PostalCode = '98011'

SELECT resource_type, request_mode, resource_description
FROM   sys.dm_tran_locks
WHERE  resource_type <> 'DATABASE'

ROLLBACK


Schema locks (Sch)

There are two types of schema locks:
  • Schema stability lock (Sch-S): Used while generating execution plans. These locks don't block access to the object data.
  • Schema modification lock (Sch-M): Used while executing a DDL statement. Blocks access to the object data since its structure is being changed.
In the example we can see the Sch-S and Sch-M locks being taken on the system tables and the TestTable plus a lot of other locks on the system tables.
BEGIN TRAN

USE AdventureWorks

CREATE TABLE TestTable (TestColumn INT)

SELECT resource_type, request_mode, resource_description
FROM   sys.dm_tran_locks
WHERE  resource_type <> 'DATABASE'

ROLLBACK


Bulk Update locks (BU)

Bulk Update locks are used by bulk operations when TABLOCK hint is used by the import. This allows for multiple fast concurrent inserts by disallowing data reading to other transactions.

Conversion locks

Conversion locks are locks resulting from converting one type of lock to another. There are 3 types of conversion locks:
  • Shared with Intent Exclusive (SIX). A transaction that holds a Shared lock also has some pages/rows locked with an Exclusive lock
  • Shared with Intent Update (SIU). A transaction that holds a Shared lock also has some pages/rows locked with an Update lock.
  • Update with Intent Exclusive (UIX). A transaction that holds an Update lock also has some pages/rows locked with an Exclusive lock.
In the example you can see the UIX conversion lock being taken on the page:
BEGIN TRAN

USE AdventureWorks

UPDATE TOP(5) Person.Address 
SET AddressLine2 = 'Test Address 2'
WHERE PostalCode = '98011'

SELECT resource_type, request_mode, resource_description
FROM   sys.dm_tran_locks
WHERE  resource_type <> 'DATABASE'

ROLLBACK


Key - Range locks

Key-range locks protect a range of rows implicitly included in a record set being read by a Transact-SQL statement while using the serializable transaction isolation level. Key-range locking prevents phantom reads. By protecting the ranges of keys between rows, it also prevents phantom insertions or deletions into a record set accessed by a transaction. In the example we can see that there are two types of key-range locks taken:
  • RangeX-X - exclusive lock on the interval between the keys and exclusive lock on the last key in the range
  • RangeS-U – shared lock on the interval between the keys and update lock on the last key in the range
SET TRANSACTION ISOLATION LEVEL SERIALIZABLE;

BEGIN TRAN

USE AdventureWorks

UPDATE Person.Address 
SET AddressLine2 = 'Test Address 2'
WHERE AddressLine1 LIKE '987 %'

SELECT resource_type, request_mode, resource_description
FROM   sys.dm_tran_locks
WHERE  resource_type <> 'DATABASE'

ROLLBACK


Lock Granularity

Lock granularity consists of TABLE, PAGE and ROW locks. If you have a clustered index on the table then instead of a ROW lock you have a KEY lock. Locking on the lower level increases concurrency, but if a lot of locks are taken consumes more memory and vice versa for the higher levels. So granularity simply means the level at which the SQL Server locks data. Also note that the more restricted isolation level we choose, the higher the locking level to keep data in correct state. You can override the locking level by using ROWLOCK, PAGLOCK or TABLOCK hints but the use of these hints is discouraged since SQL Server know what are the appropriate locks to take for each scenario. If you must use them you should be aware of the concurrency and data consistency issues you might cause.

Spinlocks

Spinlocks are a light-weight lock mechanism that doesn't lock data but it waits for a short period of time for a lock to be free if a lock already exists on the data a transaction is trying to lock. It's a mutual exclusion mechanism to reduce context switching between threads in SQL Server.

Lock Compatibility Matrix

This is taken from http://msdn2.microsoft.com/En-US/library/ms186396.aspx. Also a good resource to have is a Lock Compatibility Matrix which tells you how each lock plays nice with other lock modes. It is one of those things you don't think you need up until the moment you need it.
Use the following table to determine the compatibility of all the lock modes available in Microsoft SQL Server.

Diagram showing lock compatibility matrix

Conclusion

Hopefully this article has shed some light on how SQL Server operates with locks and why is locking of such importance to proper application and database design and operation. Remember that locking problems are of logical and not physical nature so they have to be well thought out. Locking goes hand in hand with transaction isolation levels so be familiar with those too. In the next article I'll show some ways to resolve locking problems.

References

* https://msdn.microsoft.com/En-US/library/ms186396.aspx
* https://msdn.microsoft.com/en-us/library/jj856598(v=sql.120).aspx
* http://www.sqlteam.com/author/mladen-prajdic

Thank You.

Thursday, 14 April 2016

What are the types of triggers?

There are 12 types of triggers in PL/SQL that consist of combinations of the BEFORE, AFTER, ROW, TABLE, INSERT, UPDATE, DELETE and

ALL key words:
BEFORE ALL ROW INSERT
AFTER ALL ROW INSERT
BEFORE INSERT
AFTER INSERT etc.

:- Lalit Bhutka

Wednesday, 13 April 2016

Describe the use of %ROWTYPE and %TYPE in PL/SQL


%ROWTYPE: It is responssible to declare a variable as tables structure type where as

%TYPE: it is responssible to declare a variable as tsbles column type.

:- Lalit Bhutka

Sunday, 10 April 2016

Linked Server Transaction error Msg 7395, Level 16, State 2, Line 273

Linked Server Transaction error Msg 7395, Level 16, State 2, Line 273

If you are using nested transaction in your stored procedure you will get the same error. Solution to this error is to SET XACT_ABORT  TO ON;  in your stored procedure.

:- Lalit Bhutka

Sunday, 6 March 2016

SET NOCOUNT ON Improves SQL Server Stored Procedure Performance

Problem
One of the biggest things that DBAs try to do on a daily basis is to ensure that their database systems run as fast as possible. As more and more users access the databases and the databases continue to grow, performance slow downs are almost inevitable. Based on this, DBAs and developers should do everything they possibly can to keep performance related issues in mind early in the database lifecycle. This is not always easy to do, because of the unknowns and the changes that occur over time, but there are some simple things that can be done and we will touch upon one of these in this tip.
Solution
Sometimes even the simplest things can make a difference. One of these simple items that should be part of every stored procedure is SET NOCOUNT ON. This one line of code, put at the top of a stored procedure turns off the messages that SQL Server sends back to the client after each T-SQL statement is executed. This is performed for all SELECT, INSERT, UPDATE, and DELETE statements. Having this information is handy when you run a T-SQL statement in a query window, but when stored procedures are run there is no need for this information to be passed back to the client.
By removing this extra overhead from the network it can greatly improve overall performance for your database and application.
If you still need to get the number of rows affected by the T-SQL statement that is executing you can still use the @@ROWCOUNToption. By issuing a SET NOCOUNT ON this function (@@ROWCOUNT) still works and can still be used in your stored procedures to identify how many rows were affected by the statement.
Microsoft even realized the issue that this creates and has changed the stored procedure templates from SQL Server 2000 to SQL Server 2005.
Here is the old template style available in SQL Server 2000 without the SET NOCOUNT ON.
----------------------------------------------------------------------------------------------------------------
-- =============================================
-- Create procedure basic template
-- =============================================
-- creating the store procedure
IF EXISTS (SELECT name 
FROM sysobjects
WHERE name = N'<procedure_name, sysname, proc_test>' 
AND type = 'P')
DROP PROCEDURE <procedure_name, sysname, proc_test>
GO

CREATE PROCEDURE <procedure_name, sysname, proc_test> 
<@param1, sysname, @p1> <datatype_for_param1, , int> = <default_value_for_param1, , 0>, 
<@param2, sysname, @p2> <datatype_for_param2, , int> = <default_value_for_param2, , 0>
AS
SELECT @p1, @p2
GO

-- =============================================
-- example to execute the store procedure
-- =============================================
EXECUTE <procedure_name, sysname, proc_test> <value_for_param1, , 1>, <value_for_param2, , 2>
GO
----------------------------------------------------------------------------------------------------------------
Here is the new template style available in SQL Server 2005 with the SET NOCOUNT ON.
----------------------------------------------------------------------------------------------------------------------
-- ================================================
-- Template generated from Template Explorer using:
-- Create Procedure (New Menu).SQL
--
-- Use the Specify Values for Template Parameters
-- command (Ctrl-Shift-M) to fill in the parameter
-- values below.
--
-- This block of comments will not be included in
-- the definition of the procedure.
-- ================================================
SET ANSI_NULLS ON
GO
SET QUOTED_IDENTIFIER ON
GO
-- =============================================
-- Author: <Author,,Name>
-- Create date: <Create Date,,>
-- Description: <Description,,>
-- =============================================
CREATE PROCEDURE <Procedure_Name, sysname, ProcedureName>
-- Add the parameters for the stored procedure here
<@Param1, sysname, @p1> <Datatype_For_Param1, , int> = <Default_Value_For_Param1, , 0>,
<@Param2, sysname, @p2> <Datatype_For_Param2, , int> = <Default_Value_For_Param2, , 0>
AS
BEGIN
-- SET NOCOUNT ON added to prevent extra result sets from
-- interfering with SELECT statements.
SET NOCOUNT ON;

-- Insert statements for procedure here
SELECT <@Param1, sysname, @p1>, <@Param2, sysname, @p2>
END
GO
---------------------------------------------------------------------------------------------
As you can see even simple little things such as this can make an overall improvement for your 
database environment. Stay tuned for other simple tricks and techniques to improve performance.

Wednesday, 3 February 2016

BEGIN TRAN, ROLLBACK TRAN, and COMMIT TRAN

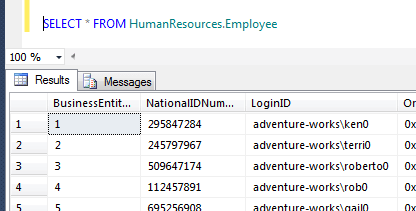
When creating a SQL Statement by default, for example, SELECT * FROM HumanResources.Employee, SQL Server will run this statement and immediately return the results:
What does BEGIN TRAN, ROLLBACK TRAN, and COMMIT TRAN mean?
If you were to add BEGIN TRANSACTION (or BEGIN TRAN) before the statement it automatically makes the transaction explicit and holds a lock on the table until the transaction is either committed or rolled back.
BEGIN TRANSACTION marks the starting point of an explicit, local transaction. - MS
For example, when I issue a DELETE or UPDATE statement I always explicitly use BEGIN TRAN to make sure my statement is correct and I get the correct number of results returned.
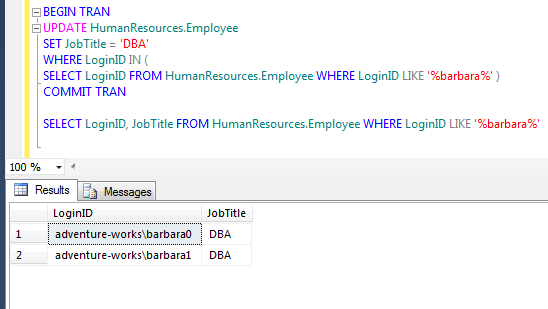
Let’s say I want to UPDATE the Employee table and set JobTitle equal to 'DBA' where LoginID is like '%barbara%'. I accidentally create my statement wrong and issue the statement below which actually would make every JobTitle equal to 'DBA':
----------------------------------------------------------------------
 UPDATE HumanResources.Employee
        SET JobTitle = ‘DBA’
        WHERE LoginID IN (
        SELECT LoginID FROM HumanResources.Employee)
----------------------------------------------------------------------

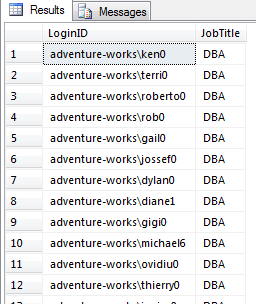
I accidentally made every record have a JobTitle of DBA
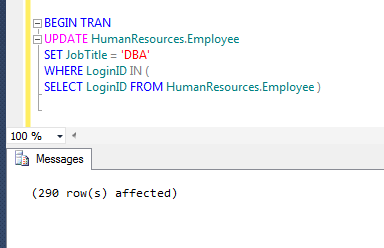
Oops! I didn’t mean to do that!! I accidentally made every record have a JobTitle of DBA. If I would have placed a BEGIN TRAN before my statement I would have noticed that 290 results would be effected and something is wrong with my statement:
If I would have placed a BEGIN TRAN before my statement I would have noticed that 290 results would be effected and something is wrong with my statement
Since I specified a BEGIN TRAN, the transaction is now waiting on a ROLLBACK or COMMIT. While the transaction is waiting it has created a lock on the table and any other processes that are trying to access HumanResources.Employee are now being blocked. Be careful using BEGIN TRAN and make sure you immediately issue a ROLLBACK or COMMIT:
Since I specified a BEGIN TRAN, the transaction is now waiting on a ROLLBACK or COMMIT
As you can see, SPID 52 is getting blocked by 54.
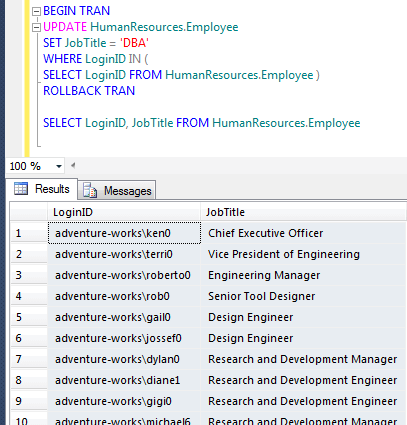
Since I noticed something was terribly wrong with my UPDATE statement, I can issue a ROLLBACK TRAN statement to rollback the transaction meaning that none of the data actually changed:
ROLLBACK TRANSACTION rolls back an explicit or implicit transaction to the beginning of the transaction, or to a savepoint inside the transaction. It also frees resources held by the transaction. - MS
As you can see, SPID 52 is getting blocked by 54.
If I had written my statement correct the first time and noticed the right amount of results displayed then I could issue a COMMIT TRAN and it would execute the statement and my changes would be committed to the database:
COMMIT TRANSACTION marks the end of a successful implicit or explicit transaction. If @@TRANCOUNT is 1, COMMIT TRANSACTION makes all data modifications performed since the start of the transaction a permanent part of the database, frees the resources held by the transaction, and decrements @@TRANCOUNT to 0. If @@TRANCOUNT is greater than 1, COMMIT TRANSACTION decrements @@TRANCOUNT only by 1 and the transaction stays active. - MS
It would execute the statement and my changes would be committed to the database.

Wednesday, 13 January 2016

Difference Between Primary key, Unique key And Foreign Key

In this blog you will learn the basic differences between Primary key, Unique key and Foreign key.


The difference between Primary key, Unique key and Foreign Key is the most common interview question for .NET developers as well as SQL server developers.
A PRIMARY Key and UNIQUE Key constraints both are similar and it provide unique enforce uniqueness of the column on which they are defined.

Primary Key
  • Primary key cannot have a NULL value.
  • Each table can have only one primary key.
  • By default, Primary key is clustered index and data in the database table is physically organized in the sequence of clustered index.
  • Primary key can be related with another table's as a Foreign Key.
  • We can generated ID automatically with the help of Auto Increment field. Primary key supports Auto Increment value.
    Unique Key
    • Allows Null value. But only one Null value.
    • Each table can have more than one Unique Constraint.
    • By default, Unique key is a unique non-clustered index.
    • Unique Constraint can not be related with another table's as a Foreign Key.
    • Unique Constraint doesn't supports Auto Increment value.
    Foreign Key
    • Foreign key is a field in the table that is primary key in another table.
    • Foreign key can accept multiple null value.
    • Foreign key do not automatically create an index, clustered or non-clustered. You can manually create an index on foreign key.
    • We can have more than one foreign key in a table.
    • There are actual advantages to having a foreign key be supported with a clustered index, but you get only one per table. What's the advantage? If you are selecting the parent plus all child records, you want the child records next to each other. This is easy to accomplish using a clustered index.
    • Having a null foreign key is usually a bad idea instead of NULL  referred to as "orphan record".
    I hope you enjoyed it.

    Monday, 11 January 2016

    Config Linked Servers in a Minute

    How to create Linked servers in a minute in an easy way
    4.JPG

    Introduction - How To Setup Linked Servers

    If you want to use a database from another Server Instance in your queries, you should do some workaround to reach your goal, or better say if you have distributed databases for an application and you want to use distributed queries here is the simple, easy solution.

    Background

    Googling around would get you to this solution but it's important to know how much time you would spend on something. On this issue, it was so time consuming to find out how to really config the server to get it working, so now it's not.

    Using the Code

    This option is also available for SQL Server 2000. You should go to [Security]>[Linked Servers] tab under the connected SQL Server Instance.

    I. Setting up Linked Server for Using as a NamedServer

    1. Connect to the specified DB Instance that you are going to use the Shared Server (Linked Server) in it.1.JPG
    2. Go to [Server Objects] and on the [Linked Servers] perform a [Right-Click] and select [New Linked Server...].
    3. In the new window on [General] page, you have to set several parameters as below:2.JPG
      1. [Linked server]LLSS (The name that will be used for addressing the Shared server)
        SELECT * FROM [LLSS].[DBName].[Schema].[TableName] 
        
        SELECT * FROM [SERVER134].[CompanyDB].[dbo].[Employee] 
      2. [Server type]: Select [Other data source] Option
      3. [Provider][Choose SQL Native Client]
      4. [Product Name]ZZZZZZZZZ (Shouldn't be empty and anything can be set, e.g. Instance Name)
        [ZZZZZZZZZ]
        
        [Server2005]
      5. [Data source]: XXX.XXX.XXX.XXX\DDSS (The Network name of SQL Server that is going to be shared on current Instance).
        [ XXX.XXX.XXX.XXX\DDSS]
        
        [192.168.100.134\Server2005]
      6. [Provider string]: (leave this parameter empty)
      7. [Location]: is disabled (leave this parameter empty)
      8. [Catalog]: the database Name (set your default database or leave it empty)
    4. Go to [Security] page, select [be made using this security context] option and set parameters as below:3.JPG
      1. [Remote login]XX (the shared server login user name)
        [XX] 
        
        [sa] 
      2. [With Password]YY (the shared server login password)
        [YY]
        
        [MyS@P@ss ]
    5. Press [OK ] and you are ready to go … and use the Linked Server as mentioned in part 3.1.

    II. Setting up Linked Server for Using as a NetworkName

    1. Connect to specified DB Instance that you are going to use the Shared Server (Linked Server) in it.
    2. Go to [Server Objects] and on the [Linked Servers] perform a [Right-Click] and select [New Linked Server...].
    3. In the new window, you have to set several parameters as below:
      1. [ Linked server] XXX.XXX.XXX.XXX\DDSS (The NetworkName of Shared Server that will be used for addressing the Shared server).
        SELECT * FROM [XXX.XXX.XXX.XXX\DDSS].[DBName].[Schema].[TableName]
        
        SELECT * FROM [192.168.100.134\SERVER2005].[ CompanyDB].[dbo].[Employee]
      2. [Server type] : Select [SQL Server] Option
    4. Go to [Security] page, select [be made using this security context] option and set parameters as below:
      1. [Remote login]XX (the shared server login user name)
        [XX] 
        
        [sa] 
      2. [With Password]YY (the shared server login password)
        [YY]
        
        [MyS@P@ss ]
    5. Press [OK ] and you are ready to go … and use the Linked Server as mentioned in part 3.1.

    Looping through table records in Sql Server

    This article lists out extensive list of example scripts for looping through table records one row at a time. This article covers the examples for the following scenario’s for looping through table rows
    1. Looping column having no gaps/duplicate values
    2. Looping column having gaps
    3. Looping column having duplicates
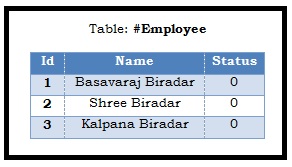
    To understand the looping of the table records in the above listed scenarios, let us first create a temporary table #Employee as shown in the below image with sample data using the following script.
    WHILE Loop Example Sql Server
    Script:
    USE TEMPDB
    GO
    CREATE TABLE #Employee
    (Id INT, Name NVARCHAR(100), Status TINYINT)
    GO
    INSERT INTO #Employee ( Id, Name, Status)
    Values (1, 'Basavaraj Biradar', 0),
            (2, 'Shree Biradar', 0),
            (3, 'Kalpana Biradar', 0)
    GO
    The below examples illustrates how we can loop through table records in various ways. And also highlights the problem if any. Please go through all the examples before deciding on using one particular approach.

    Example 1: Looping column having no gaps/duplicate values

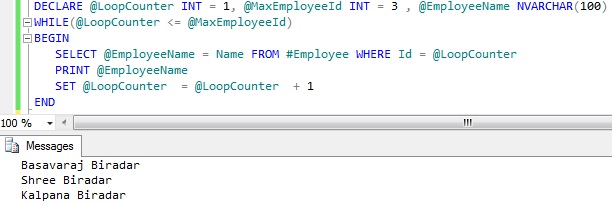
    Approach 1: Looping through table records with static loop counter initialization
    DECLARE @LoopCounter INT = 1, @MaxEmployeeId INT = 3 ,
            @EmployeeName NVARCHAR(100)
     
    WHILE(@LoopCounter <= @MaxEmployeeId)
    BEGIN
       SELECT @EmployeeName = Name
       FROM #Employee WHERE Id = @LoopCounter
     
       PRINT @EmployeeName 
       SET @LoopCounter  = @LoopCounter  + 1       
    END
    RESULT:
    Looping through table records Sql Server 1
    In this example the loop running variable @LoopCounter and the maximum loop counter variable @MaxEmployeeId values are initialized with a static value.
    Note: This approach of looping through table rows doesn’t work if the looping column (i.e. in this case Id column of the #Employee table) values have gaps or if it has duplicate values
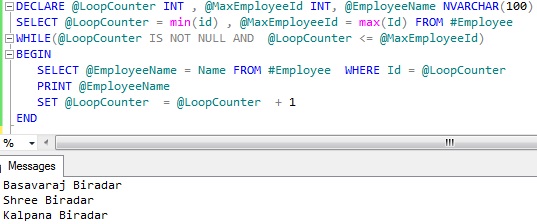
    Approach 2: Looping through table records with dynamic loop counter initialization
    DECLARE @LoopCounter INT , @MaxEmployeeId INT,
            @EmployeeName NVARCHAR(100)
    SELECT @LoopCounter = min(id) , @MaxEmployeeId = max(Id)
    FROM #Employee
     
    WHILE(@LoopCounter IS NOT NULL
          AND @LoopCounter <= @MaxEmployeeId)
    BEGIN
       SELECT @EmployeeName = Name
       FROM #Employee WHERE Id = @LoopCounter
        
       PRINT @EmployeeName 
       SET @LoopCounter  = @LoopCounter  + 1       
    END
    RESULT:
    Looping through table records Sql Server 2
    In this example the loop running variable @LoopCounter and the maximum loop counter variable @MaxEmployeeId values are initialized dynamically.
    Note: This approach of looping through table rows doesn’t work if the looping column (i.e. in this case Id column of the #Employee table) values have gaps or if it has duplicate values

    Example 2: Looping through table records where looping column has gaps

    Issue with example 1’s approach 1 and 2: These example approaches are assuming that looping column values doesn’t have any gap in it. Let us see what is the output of the example 1’s approach 1 and 2 if we have gaps in the looping column value.
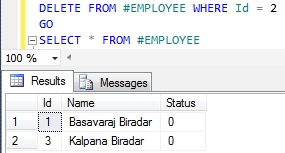
    To create a gap, delete employee record from the #Employee table with id = 2 by the following script:
    DELETE FROM #EMPLOYEE WHERE Id = 2
    RESULT:
    Looping through table records Sql Server 3
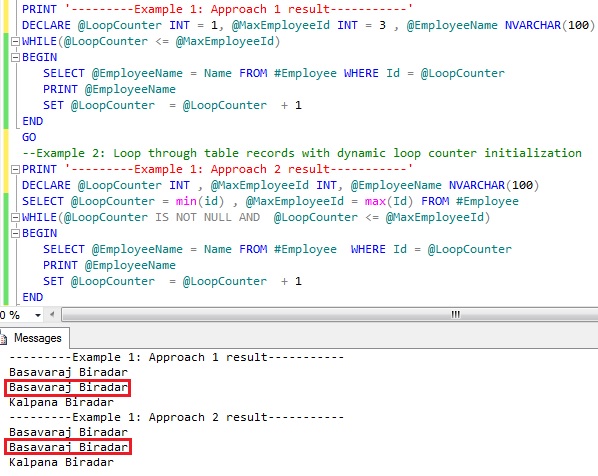
    Now let us run the example 1’s approach 1 and 2 script on #Employee table which is having gap in the Id column value (i.e. record with id column value 2 is missing).
    Looping through table records Sql Server 12
    From the above result it is clear that the example 1’s approach 1 and 2 script will not work in the scenarios where we have gap in the looping tables column values.
    This problem can solved in multiple ways, below are two such example approaches. I would prefer the first approach.
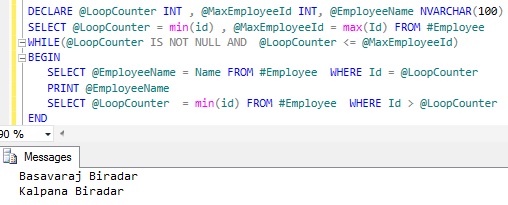
    Approach 1: Looping through table records where looping column has gaps in the value
    DECLARE @LoopCounter INT , @MaxEmployeeId INT,
            @EmployeeName NVARCHAR(100)
    SELECT @LoopCounter = min(id) , @MaxEmployeeId = max(Id)
    FROM #Employee
     
    WHILE ( @LoopCounter IS NOT NULL
            AND  @LoopCounter <= @MaxEmployeeId)
    BEGIN
       SELECT @EmployeeName = Name FROM #Employee
       WHERE Id = @LoopCounter
       PRINT @EmployeeName 
       SELECT @LoopCounter  = min(id) FROM #Employee
       WHERE Id > @LoopCounter
    END
    RESULT:
    Looping through table records Sql Server 6
    From the above result it is clear that this script works even when we have gaps in the looping column values.
    Note: This approach of looping through table rows doesn’t work if the looping column (i.e. in this case Id column of the #Employee table) has duplicate values
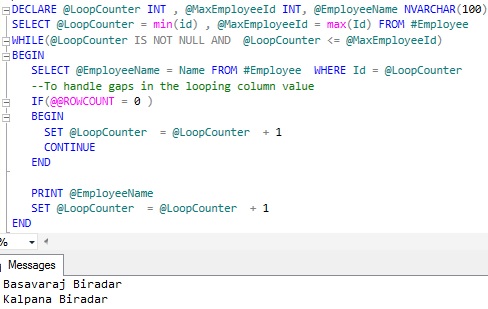
    Approach 2: Looping through table records where looping column has gaps in the value
    DECLARE @LoopCounter INT , @MaxEmployeeId INT,
            @EmployeeName NVARCHAR(100)
    SELECT @LoopCounter = min(id) , @MaxEmployeeId = max(Id)
    FROM #Employee
    WHILE ( @LoopCounter IS NOT NULL
            AND  @LoopCounter <= @MaxEmployeeId)
    BEGIN
       SELECT @EmployeeName = Name
       FROM #Employee WHERE Id = @LoopCounter
       --To handle gaps in the looping column value
       IF(@@ROWCOUNT = 0 )
       BEGIN
         SET @LoopCounter  = @LoopCounter  + 1
         CONTINUE
       END
     
       PRINT @EmployeeName 
       SET @LoopCounter  = @LoopCounter  + 1       
    END
    Looping through table records Sql Server 7
    From the above result it is clear that this script works even when we have gaps in the looping column values.
    Note: This approach of looping through table rows doesn’t work if the looping column (i.e. in this case Id column of the #Employee table) has duplicate values

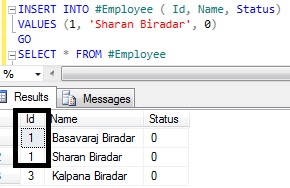
    Example 3: Looping through table records where looping column having duplicates

    To create a duplicate record, insert one more employee record to the #Employee table with id = 1 by the following script:
    INSERT INTO #Employee ( Id, Name, Status)
    Values (1, 'Sharan Biradar', 0)
    RESULT:
    Looping through table records Sql Server 8
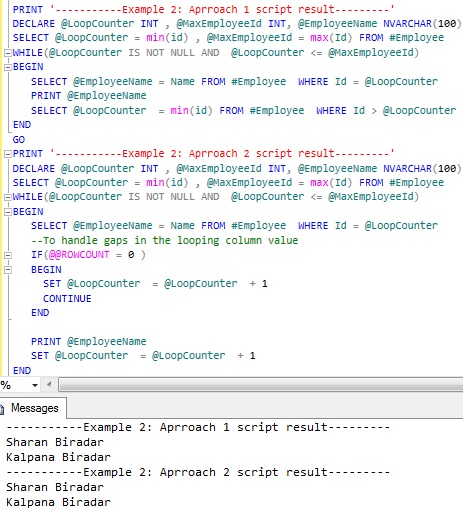
    Now let us run the example 2’s approach 1 and 2 script on #Employee table which is having duplicate Id column values (i.e. there are two records with with Id column value as 1)
    Looping through table records Sql Server 13
    From the above result it is clear that the example 2’s approach 1 and 2 script will not work in the scenarios where we have duplicates in the looping column. Here only one record of the employee with id =1 is displayed and other record is skipped. This problem can solved in multiple ways, below are two such example approaches.
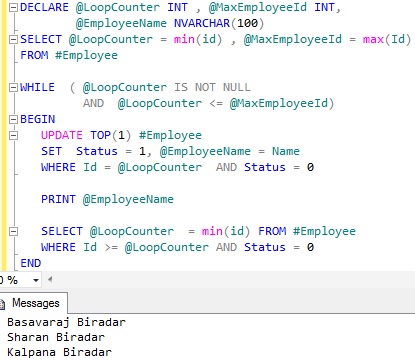
    Approach 1: Looping through table records where looping column has duplicate values
    SET NOCOUNT ON
    DECLARE @LoopCounter INT , @MaxEmployeeId INT,
            @EmployeeName NVARCHAR(100)
    SELECT @LoopCounter = min(id) , @MaxEmployeeId = max(Id)
    FROM #Employee
      
    WHILE  ( @LoopCounter IS NOT NULL
             AND  @LoopCounter <= @MaxEmployeeId)
    BEGIN
       UPDATE TOP(1) #Employee
       SET  Status = 1, @EmployeeName = Name
       WHERE Id = @LoopCounter  AND Status = 0
      
       PRINT @EmployeeName 
      
       SELECT @LoopCounter  = min(id) FROM #Employee 
       WHERE Id >= @LoopCounter AND Status = 0
    END
    RESULT:
    Looping through table records Sql Server 10
    In this approach using the Status column to mark the records which are already processed. And also the update statement is used to update the status and also get the row values and one more thing is in Update using the TOP statement to update only one record at a time.
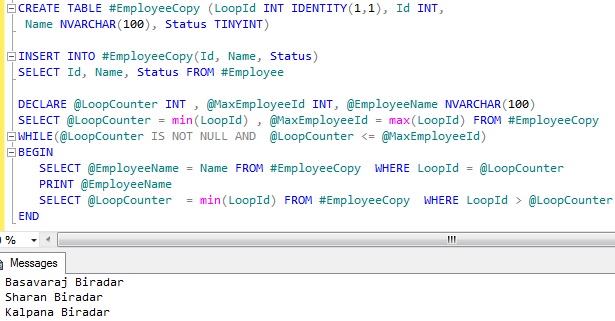
    Approach 2: Looping through table records where looping column has duplicate values by inserting records into another temp table with identity column
    --Create another temp table with identity column
    CREATE TABLE #EmployeeCopy (LoopId INT IDENTITY(1,1),
      Id INT, Name NVARCHAR(100), Status TINYINT)
    --Copy data to the table with identity column
    INSERT INTO #EmployeeCopy(Id, Name, Status)
    SELECT Id, Name, Status FROM #Employee
     
    DECLARE @LoopCounter INT , @MaxEmployeeId INT,
            @EmployeeName NVARCHAR(100)
    SELECT @LoopCounter = min(LoopId),@MaxEmployeeId = max(LoopId)
    FROM #EmployeeCopy
    WHILE ( @LoopCounter IS NOT NULL
            AND  @LoopCounter <= @MaxEmployeeId)
    BEGIN
       SELECT @EmployeeName = Name
       FROM #EmployeeCopy  WHERE LoopId = @LoopCounter
       PRINT @EmployeeName 
       SELECT @LoopCounter  = min(LoopId)
       FROM #EmployeeCopy  WHERE LoopId > @LoopCounter
    END
    RESULT:
    Looping through table records Sql Server 11
    In this article I have covered most of the basic scenarios which we across. If you have any other scenario and use different approach, post a comment I will update the article.