Friday, 27 November 2015

How To Create Setup File(.Exe File) From Windows Forms Application

This is the most important tutorial for creating the Setup File(.exe file) from windows forms application.You can easily install it any windows computers.You can use it only windows platform.
Now i am going to convert these windows forms application to the Setup File. Friends who have not read my previous tutorials please read  first this tutorial and download it, otherwise you will not understand correctly.For read the previous tutorial .
There are some steps to create Setup File From windows forms applications. please follow these steps carefully. 

Step1:-  First open your windows form application in your visual studio.Here i am using visual studio 2010 and my windows forms application Name is "test",which had made in previous tutorial.you can download it Clickdownload. 
Now i am going to open "test" application in visual studio 2010,my "test" application is on desktop. See it carefully and open your application together.


Step2:-  Now open "test" application in visual studio 2010,which is given below, follow it. Open visual studio 2010->File->Open project/solution->select the application "test"Folder_> click open.
See it:-


Step3:-  First see Form1.cs,Form2.cs and Solution Explorer window for remember previous post.
Form1.cs:->

Form2.cs:->


Step4:-> Now open solution explorer(if not open)->Add New Item->Select Application Configuration File->Click Add 
See it:->

See App.Config File:-It is used for creating connection to the database. It is optional.

Step5:- First create table in database,here i am already created "RAM"table in previous tutorial.See it:


  • write the connection string for creating the connection database table "RAM" in app.Config file.if You want to create otherwise  escape it
See it:->


Step6:-  Now this is main step to create the step. Open Solution Explorer->Click  on 'solution'test'('project)->Add New Project->Select other project types from left window->Select visual studio Installer->Select the setup Wizard-> write your setup name in below(mysetup)->click OK.


Step7:- 
  •  One wizard will be opened->click 'Next' Button.
See it:-


  • Select Radio button "Create a setup for a windows application" ->Click Next.
See it:-


  • Select "Primary output from text"-> Click Next.
See it:- 

  • Click Add Button->go your application folder,which you want to create setup.
See it:- 

  • Select the "App"File from your project ("test")-> click Open Button.
See it:- 
  • Now click Next Button.
See it:- 
  • Click Finish Button.
See it:- 


  • Now click Application Folder From left side window.
See it:-

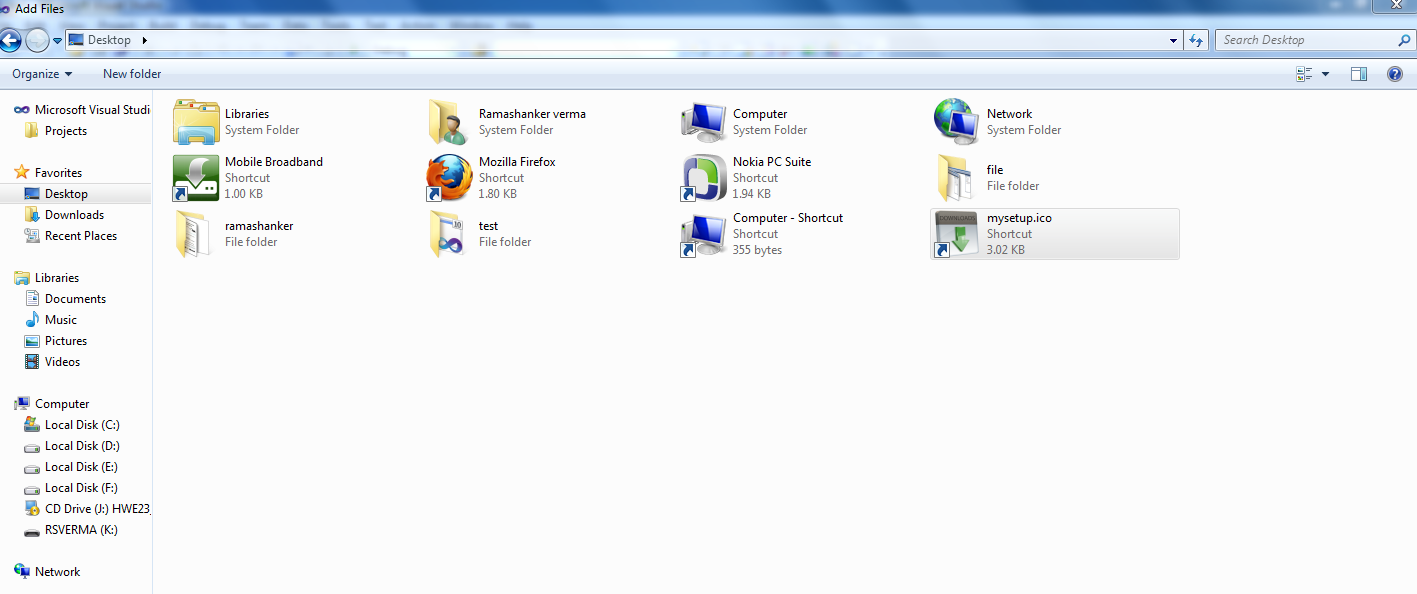
  • Go right side window-> Right mouse click ->Add file->select icon file (extension . icon) , This icon will  show on Your desktop when you install the setup on computer.
See it:


  • Now create shortcut file of "Primary Output File" by l Right mouse click on  Primary Output File.
See it:


  • Now  change shortcut folder, here i have changed 'mysetup'.
See it: 


  • Now Right mouse click on ' mysetup' Shortcut and go property window.
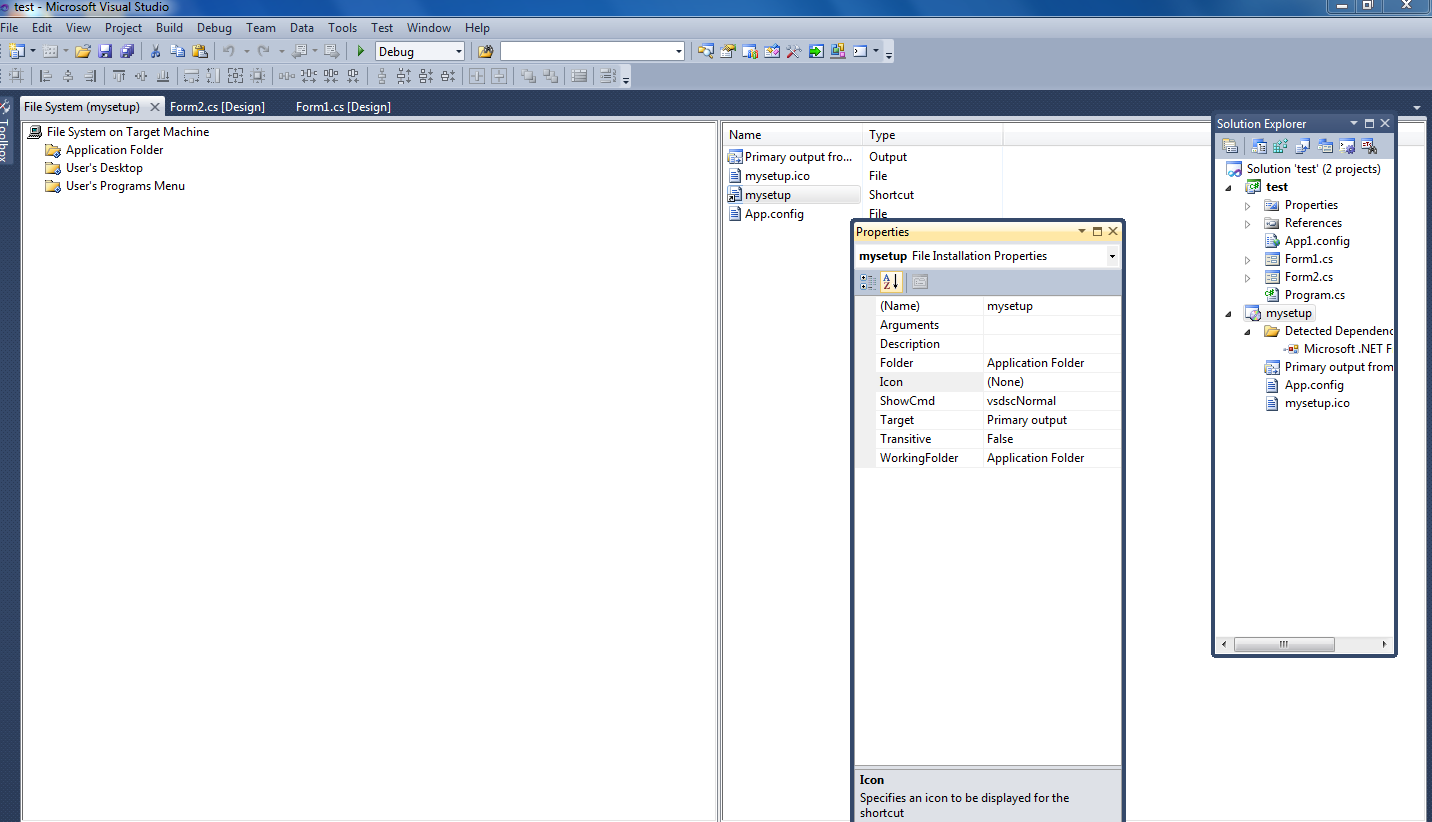
See it:  

  • Click Icon and  select browse.
See it:  

  • Click Browse Button.
See it:  

  • Click Application Folder and select "mysetup"Icon file->click OK.
See it:  

  • Again select icon file and click OK button.
See it:  

  • Drag and drop 'mysetup shortcut' User's Desktop (left side window).
See it: 
  • Now again create shortcut primary output->rename it again mysetup ->  again add icon File from the mysetup property window as before we have added.
See it: 


  • Now Add New Folder in "User's program menu"(left side window) and  change Name it as setup->Now again Drag and Drop mysetup shortcut  to the setup.
See it:  

  • Now go "Solution Explorer window"-> Right mouse click on mysetup->Click Build. wait some time whenever setup is not successfully build-> Your setup is build successfully->Go and open your application Folder("test").
See it: 


  • click mysetup:-
See it:- 

  • ->Click Debug Folder.
See it:-    

Step8:- Before installing the setup you First install .NET FRAMEWORK 4.0 on your system,Click here for download . whenever you install this setup on your window (OS) and open it then you will see like this:-


Thursday, 26 November 2015

Boxing And Unboxing In VB.NET

Boxing is simply the process of converting a value type to any interface type implemented by the current value type; the most common being the Value object. Boxing is used to store value types in the garbage-collected heap.
This means that, once a variable is boxed, it can hold a separate value in a separate memory location. When a value type is boxed, a new object must be allocated and constructed.
Boxing and unboxing is an important concept in VB.NET's type system. With Boxing and Unboxing one can link between value-types and reference-types by allowing any value of a value-type to be converted to and from type object.

Boxing
  • Boxing is a mechanism in which value type is converted into reference type.
  • It is implicit conversion process in which object type (super type) is used.
  • In this process type and value both are stored in object type
Unboxing
  • Unboxing is a mechanism in which reference type is converted into value.
  • It is explicit conversion process.

Program to show Boxing and Unboxing:

Module
 Module1
    
Sub Main()
        
Dim i As Integer = 10
        
Dim j As Integer
        ' boxing
        Dim o As Object
        o = i
        
'unboxing
        j = CInt(o)
        Console.WriteLine(
"value of o object : " & o)
        Console.WriteLine(
"Value of j : " & j)
        Console.ReadLine()
    
End Sub
End
 Module

Output of above program:


Conclusion:

Hope the article might have helped you in understanding Boxing and Unboxing. 

Wednesday, 25 November 2015

#table vs. @Table

SQL Server tables: what is the difference between @, # and ##?


Ø  #table refers to a local (visible to only the user who created it) temporary table.
Ø  ##table refers to a global (visible to all users) temporary table.
Ø  @variableName refers to a variable which can hold values depending on its type.


Temporary Tables vs. Table Variables and Their Effect on SQL Server Performance

Ø  The first difference is that transaction logs are not recorded for the table variables.

After declaring our temporary table #T and our table-variable @T, we assign each one with the same “old value” string. Then, we begin a transaction that updates their contents. At this point, both will now contain the same “new value” string. But when we rollback the transaction, as you can see, the table-variable @T retained its value instead of reverting back to the “old value” string. This happened because, even though the table-variable was updated within the transaction, it is not a part of the transaction itself.
Example:

create table #T (s varchar(128)) 
declare @T table (s varchar(128)) 
insert into #T select ‘old value #’ 
insert into @T select ‘old value @’ 
begin transaction 
     update #T set s=’new value #’ 
     update @T set s=’new value @’ 
rollback transaction 
select * from #T 
select * from @T 

s 
————— 
old value # 

s 
————— 
new value @

Ø  The second major difference is that any procedure with a temporary table cannot be pre-compiled, while an execution plan of procedures with table variables can be statically compiled in advance. Pre-compiling a script gives a major advantage to its speed of execution. This advantage can be dramatic for long procedures, where recompilation can be too pricy.

Finally, table variables exist only in the same scope as variables. Contrary to the temporary tables, they are not visible in inner stored procedures and in exec(string) statements. Also, they cannot be used in an insert/exec statement.
But let’s compare both in terms of performance.
At first, we prepare a test table with 1 million records:
create table NUM (n int primary key, s varchar(128)) 
GO 
set nocount on 
declare @n int 
set @n=1000000 
while @n>0 begin 
     insert into NUM 
          select @n,’Value: ‘+convert(varchar,@n) 
     set @n=@n-1 
     end 
GO


Conclusion

1.    1. There is no universal rule for when and where to use temporary tables or table variables. Try them both and experiment.
2.    2. In your tests, verify both sides of the spectrum—small numbers of records and huge data sets.

3.    3. Be careful with migrating to SQL 2005 when you use complicated logic in your stored procedures. The same code can run 10-100 times slower on SQL server 2005!

SQL Server Stored Procedure

SQL Server Stored Procedure
Ø  (Introduction)
A stored procedure is nothing more than prepared SQL code that you save so you can reuse the code over and over again.  So if you think about a query that you write over and over again, instead of having to write that query each time you would save it as a stored procedure and then just call the stored procedure to execute the SQL code that you saved as part of the stored procedure.
Ø  Overview
There are various options that can be used to create stored procedures.  In these next few topics we will discuss creating a simple stored procedure to more advanced options that can be used when creating stored procedures.
Ø  Explanation
Some of the topics we will cover include:
è Simple Query
Select * from K_USER_DTL
è  Stored Procedure 
    
    CREATE PROCEDURE usrdtl
      AS
              Select * from K_USER_DTL
      GO

è  Execute

      EXEC usrdtl  
è One Parameters
Select * from K_USER_DTL
è  Stored Procedure 
    
    CREATE PROCEDURE usrdtl @pDepartment varchar(30)
      AS
              Select * from K_USER_DTL
              Where UsrDepartment = @PDepartment
      GO
è  Execute

      EXEC usrdtl @pDepartment = ‘IT’
è Default Parameters
è  Stored Procedure 
 
    CREATE PROCEDURE usrdtl @pDepartment varchar(30) = NULL
      AS
              Select * from K_USER_DTL
              Where UsrDepartment = ISnull(@PDepartment, UsrDepartment)
      GO
è Multipal Parameters
è  Stored Procedure 
    
    CREATE PROCEDURE usrdtl  @pDepartment varchar(30) = NULL, @pCategories varchar(30) = Null
      AS
              Select * from K_USER_DTL
              Where UsrDepartment = ISnull(@PDepartment, UsrDepartment)
                       AND UsrCategories LIKE ‘%’ + isnull(@pCategories, UsrCategories) + ‘%’
      GO
è  Execute

      EXEC usrdtl @pDepartment = ‘IT’ , @pCategories = ‘ad’
è Simple Output
è  Stored Procedure 
    
    CREATE PROCEDURE usrdtl  @pDepartment varchar(30) = NULL, @ocount int Output
      AS
              Select @ocount  = Count(*) from K_USER_DTL
              Where UsrDepartment = ISnull(@PDepartment, UsrDepartment)
                      
      GO
è  Execute

DECLARE @totCount int
EXEC usrdtl @pDepartment = ‘IT’, @ totCount OUTPUT
SELECT @ totCount
*       Using Try Catch
è  Stored Procedure 
    
CREATE PROCEDURE uspTryCatchTest
AS
BEGIN TRY
              SELECT 1/0
END TRY
BEGIN CATCH
     SELECT ERROR_NUMBER() AS ErrorNumber
     ,ERROR_SEVERITY() AS ErrorSeverity
     ,ERROR_STATE() AS ErrorState
     ,ERROR_PROCEDURE() AS ErrorProcedure
     ,ERROR_LINE() AS ErrorLine
     ,ERROR_MESSAGE() AS ErrorMessage;
END CATCH
 
è  Execute

DECLARE @totCount int
EXEC usrdtl @pDepartment = ‘IT’, @ totCount OUTPUT
SELECT @ totCount

v  Notes:
1.    Before you create a stored procedure you need to know what your end result is, whether you are selecting data, inserting data, etc..
2.    On thing to note is that you cannot use the keyword "GO" in the stored procedure.  Once the SQL Server compiler sees "GO" it assumes it is the end of the batch
3.    If you are not familiar with the Try...Catch paradigm it is basically two blocks of code with your stored procedures that lets you execute some code, this is the Try section and if there are errors they are handled in the Catch section.

4.    A great new option that was added in SQL Server 2005 was the ability to use the Try..Catch paradigm that exists in other development languages.  Doing error handling in SQL Server has not always been the easiest thing, so this option definitely makes it much easier to code for and handle errors.

Reff:- Read

Find Missing date Query

Ø  Source table

  select Distinct  CONVERT (DATE, EntDt) as dt from  dbo.K_RPT_EMAIL_STATUS
  order by CONVERT (DATE, EntDt)  asc


Ø  Create Function

Create FUNCTION [dbo].[GetAllDaysInBetween](@FirstDay DATETIME, @LastDay DATETIME)
RETURNS @retDays TABLE
(
    DayInBetween DATETIME
)
AS
BEGIN
    DECLARE @currentDay DATETIME
    SELECT @currentDay = @FirstDay

    WHILE @currentDay <= @LastDay
    BEGIN

        INSERT @retDays (DayInBetween)
            SELECT @currentDay

        SELECT @currentDay = DATEADD(DAY, 1, @currentDay)
    END

    RETURN
END

Ø  Final Query

SELECT  DayInBetween AS missingDate
       FROM dbo.GetAllDaysInBetween('2014-11-25', '2015-11-24') AS AllDaysInBetween
  WHERE NOT EXISTS
      (select Distinct  CONVERT (DATE, EntDt) as dt from  dbo.K_RPT_EMAIL_STATUS
        WHERE CONVERT (DATE, EntDt)  = AllDaysInBetween.DayInBetween  )


SQL Client Statistics


SQL Server Management Studio: “Include Client Statistics” Button


This button is located on the SQL Editor toolbar.

Open a query editor window, click on it to highlight it, write a query, and execute it. Your results will look like Figure 1.


Figure 1 – Client Statistics
Some really valuable information can be found here, such as the number of INSERT, DELETE, UPDATE, and SELECT statements – think of how useful that can be when tuning a complex stored procedure. You can see the number of rows affected or returned, and the number of transactions executed.
The network statistics lets you see how much traffic is moving from your client to the server and back.
The time statistics tells you how much time was spent processing on the client versus how much time was spent waiting for the server. These figures are in milliseconds.
That’s useful when you run a query once, but its usefulness becomes more apparent when you are tuning a query. Statistics will be shown for the ten most recent executions, and they will be averaged, as shown in Figure 2. Thus, as you are making changes to a query – perhaps changing the conditions in the WHERE clause, or comparing an AVERAGE to a window function – the statistics will update. You can, at a glance, compare the changes. You’ll even see green arrows for improved performance, and red arrows for worse performance.


Figure 2 – Client Statistics for multiple executions of a query

Entity Framework

Entity Framework
ADO.NET is a very strong framework for data access. 
ADO.NET has been around since many years and there are a lot of systems running over ADO.NET. Developers who are totally oblivious to the concept of ORMs will probably be asking "What is Entity Framework? What are the benefits of using it and is it an alternative to ADO.NET?"
Well, to answer the first question about what is Entity Framework, Entity Framework is an Object Relational Mapper (ORM). It basically generates business objects and entities according to the database tables and provides the mechanism for:
1.       Performing basic CRUD (Create, Read, Update, Delete) operations.
2.       Easily managing "1 to 1", "1 to many", and "many to many" relationships.
3.       Ability to have inheritance relationships between entities.
and to answer the second question, the benefits are:
1.       We can have all data access logic written in higher level languages.
2.       The conceptual model can be represented in a better way by using relationships among entities.
3.       The underlying data store can be replaced without much overhead since all data access logic is present at a higher level.
and finally, the last question that whether it is an alternative to ADO.NET, the answer would be "yes and no". Yes because the developer will not be writing ADO.NET methods and classes for performing data operations and no because this model is actually written on top of ADO.NET, meaning under this framework, we are still using ADO.NET. So let us look at the architecture of Entity Framework (diagram taken from MSDN):


More Read: Click here