Saturday, 23 April 2016

SSIS - Raw File Format

Raw File Format
Starting with the definition, the raw file format is the data format that is native to SSIS.  When data is being consumed by the data flows of an SSIS package it has a format.  This format is the same that appears in raw files.
Since these are the same file format, SSIS doesn’t have to parse or translate the data between the data streams or the raw file format.  This results in the raw file format being faster than most other data source and destination formats
The raw file format can be incredibly useful.  It can be used for either a data source or a data destination.  Once you’ve gotten your hands wet with them, you’ll find a great many uses.  Some of which may solve issues that you’ve run into with previous development projects.
For instance if you want to build an SSIS package that processes data in multiple steps, temporary versions of the data can be stored in raw files and passed between data flows.  This will allow packages to be built such that they can be restarted at different points in the data processing.
Similar to the previous example, raw files can be used to exchange data between SSIS packages.  You can develop one package to convert a clients file to a standardized structure in the raw file format.  And then use a couple other packages to read that format in the next packages that process the data in a standard format.  All of this can be done without hitting the database.
Another thing you can do is export data from a database to a raw file to use a reference file for multiple SSIS packages.  If you need to cycle through a group of IDs or states multiple time, store the data in a raw file and use it as a data cache.  Sure you can use a Lookup Cache instead – but that doesn’t fit all scenarios and not everyone is using SQL Server 2008.
Let’s move onto a couple demonstrations

Raw File Format Destination

First off, let’s build an SSIS package that uses a Raw File as destination.  We’ll fast forward through adding the Data Flow and the OLE DB Source.  The query for the source doesn’t matter for this demonstration so we’ll skip over that too.
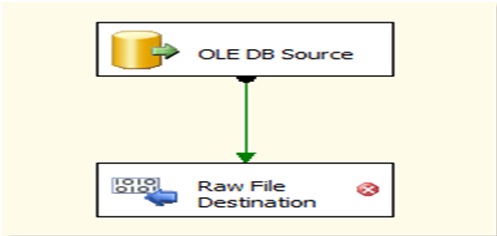
Let’s begin.  Start by dragging a Raw File Destination onto the Data Flow and connecting the OLE DB Source to it.  The package should look like this:

From here, open the Raw File Destination so that we can configure it.  The first thing you will need to configure is the location for the raw file.  This can either be a static value or tied to a variable.  In most cases I use variables to improve configurability between environments

Next you’ll configure how you want the Raw File Destination to behave when it writes.  The write option selection is important since it will have significant impact on how the destination is populated
There are a few options for this, they are (definitions from Books Online):
  • Append: Appends data to an existing file. The metadata of the appended data must match the file format.
  • Create always: Always creates a new file.
  • Create once: Creates a new file. If the file exists, the component fails.
  • Truncate and append: Truncates an existing file and then writes the data to the file. The metadata of the appended data must match the file format.
Missing from this list is a Create First Time or Create Metadata option.  As you begin to use the file format more, you’ll realize that this is an important option to have.  Please, help out by voting for a metadata option for raw files.
At this point, you can move to the next screen and select the columns you need.  There is a select all checkbox for SQL Server 2008 and forward, which is quite handy.  For SQL Server 2005, you need to select all of the columns individually.

One extremely nice thing about the Raw File Destination is that the order of the columns in it don’t matter.  Whether you add a column now or in six months it’s position in the raw data file doesn’t matter.  Or if you forget to add a column that data source expects and it is setup for the source as the first column.
Execute the package and you will have a Raw File created.

Raw File Format Source

Now that we have a file to work with, let’s create a quick package that can import some data from a raw file.  As before, we’ll skip going through adding the Data Flow and then Raw File Source and Row Sampling task.  The Row Sampling task is just there to provide a place to add a data viewer if you desire to see the data that is returned.

Configuration for the the Raw File Source is similar to the Raw File Destination.  Open up the data source and first you determine the location for the raw file.  Same options as above with either be a static value or tied to a variable.

Next you’ll select the columns that you want returned.  They can be selected through the check boxes or by typing their names in the grid below.  The column names can also be changed at this point in the Output Column column.

At this point the Raw File Data Source is configured.  It knows the underlying data so there isn’t any need to call up and discuss this with the person that created the raw file, if it isn’t you.  The steps are simple and not likely to get you bogged down in details – since there really aren’t any.

Raw File Wrap-Up

Now that we’ve got through this far, I hope that you see some of the value is using the raw files.  I’ve got a couple upcoming posts in this series that will go deeper into their actual use, but for now this should get you started.
One bit of advice that I’ll leave you with.  After the data types for you data source or data destination are set it is wise to change the ValidateExternalMetadata property to False.  This prevents some pesky data type and file availability issues that can come up during validation and helps prevent accidentally changing data types.

References Download Package

Thank You

Friday, 15 April 2016

Tips To Get A Salary Increment


Asking for a pay hike can be a tricky affair. Even after a lot of discussions with your boss, you might end up having nothing more than mere assurances.

Your appraisal depends on a lot of factors, some of which you have no control over. A recession hit market, company's financial loss, etc are examples of some such reasons.

However, there still a whole lot of things that are indeed in your control and you can try to maneuver these factors to get the kind of hike that you are looking at. Here's what you can do:

List down your responsibilities:

Make a bulleted list of all the responsibilities handled by you in the last one year. Do not miss out on any task. Then try explaining the problems faced by you while performing them and the way adopted to overcome the difficulties.

Self initiated efforts are always acknowledged with respect. Therefore make sure you dedicate enough time for the list.

Make a note of the extra work:

It is important to have undertaken additional responsibilities in your work-life. This not only shows your dedication towards work but also the capability to accommodate more work within the allotted time. Your willingness and confidence will help your boss to build trust in you.
Speak about the added skills: 
Sometimes you need to learn certain skills do be able to perform your current job better. Point out any skill-building activities you've done or professional training courses you've taken. Any knowledge transfer or training to other team members should also be spoken about during the performance review meetings.

Prepare yourself:

Collect your thoughts and prepare yourself for the meeting. Get your points ready and keep all inferences to work at the back of your mind. Remember to use positive terms and sound confident in the meeting. Present your case clearly and logically.

Talk to the decision-maker, not HR, if you can: 

Often people throw themselves into negotiations with people who don't have any power over pay. It's a waste of time. Many times the company appoints a person from the HR team to have pay discussions, who might then pass pay rise requests up the line, but often key messages are lost or distorted. So try and find out who are the key decision makers and also look at ways that you can speak with them.

Get the data:

It is important to know what others in similar positions are being paid by competitors and the employer in question via salary surveys from recruiters or word of mouth.
This will give you an idea how less or more you are getting in terms of market competition.


Pick The Right Time:

People pick the right time and a quiet, private place for having a salary discussion and book a meeting rather than casually stopping by to ensure they get the decision-maker's attention.
You don't want to be going in when the person you are dealing with has had bad news or there's a crisis in the organization. The right time will also depend on the work cycle in the organization.


Don't just accept the first offer:

Whether you should take a first offer from an employer depends on what was offered and your circumstances.

Read the person's mine you are dealing with for salary negotiations and be open to accepting a good salary offer, particularly in the current economic climate.


But in senior executive positions, sales roles, and other jobs where people are expected to be good at bargaining, taking a first offer can be a big mistake, as employers tend to anticipate bargaining in such roles and build this into their first offer.


Be ready. Don't wait for someone to recognize your achievements. Step forward and request for your promotion.

Thank You

Thursday, 14 April 2016

What are the types of triggers?

There are 12 types of triggers in PL/SQL that consist of combinations of the BEFORE, AFTER, ROW, TABLE, INSERT, UPDATE, DELETE and

ALL key words:
BEFORE ALL ROW INSERT
AFTER ALL ROW INSERT
BEFORE INSERT
AFTER INSERT etc.

:- Lalit Bhutka

Wednesday, 13 April 2016

Describe the use of %ROWTYPE and %TYPE in PL/SQL


%ROWTYPE: It is responssible to declare a variable as tables structure type where as

%TYPE: it is responssible to declare a variable as tsbles column type.

:- Lalit Bhutka

Sunday, 10 April 2016

Linked Server Transaction error Msg 7395, Level 16, State 2, Line 273

Linked Server Transaction error Msg 7395, Level 16, State 2, Line 273

If you are using nested transaction in your stored procedure you will get the same error. Solution to this error is to SET XACT_ABORT  TO ON;  in your stored procedure.

:- Lalit Bhutka

Sunday, 6 March 2016

SET NOCOUNT ON Improves SQL Server Stored Procedure Performance

Problem
One of the biggest things that DBAs try to do on a daily basis is to ensure that their database systems run as fast as possible. As more and more users access the databases and the databases continue to grow, performance slow downs are almost inevitable. Based on this, DBAs and developers should do everything they possibly can to keep performance related issues in mind early in the database lifecycle. This is not always easy to do, because of the unknowns and the changes that occur over time, but there are some simple things that can be done and we will touch upon one of these in this tip.
Solution
Sometimes even the simplest things can make a difference. One of these simple items that should be part of every stored procedure is SET NOCOUNT ON. This one line of code, put at the top of a stored procedure turns off the messages that SQL Server sends back to the client after each T-SQL statement is executed. This is performed for all SELECT, INSERT, UPDATE, and DELETE statements. Having this information is handy when you run a T-SQL statement in a query window, but when stored procedures are run there is no need for this information to be passed back to the client.
By removing this extra overhead from the network it can greatly improve overall performance for your database and application.
If you still need to get the number of rows affected by the T-SQL statement that is executing you can still use the @@ROWCOUNToption. By issuing a SET NOCOUNT ON this function (@@ROWCOUNT) still works and can still be used in your stored procedures to identify how many rows were affected by the statement.
Microsoft even realized the issue that this creates and has changed the stored procedure templates from SQL Server 2000 to SQL Server 2005.
Here is the old template style available in SQL Server 2000 without the SET NOCOUNT ON.
----------------------------------------------------------------------------------------------------------------
-- =============================================
-- Create procedure basic template
-- =============================================
-- creating the store procedure
IF EXISTS (SELECT name 
FROM sysobjects
WHERE name = N'<procedure_name, sysname, proc_test>' 
AND type = 'P')
DROP PROCEDURE <procedure_name, sysname, proc_test>
GO

CREATE PROCEDURE <procedure_name, sysname, proc_test> 
<@param1, sysname, @p1> <datatype_for_param1, , int> = <default_value_for_param1, , 0>, 
<@param2, sysname, @p2> <datatype_for_param2, , int> = <default_value_for_param2, , 0>
AS
SELECT @p1, @p2
GO

-- =============================================
-- example to execute the store procedure
-- =============================================
EXECUTE <procedure_name, sysname, proc_test> <value_for_param1, , 1>, <value_for_param2, , 2>
GO
----------------------------------------------------------------------------------------------------------------
Here is the new template style available in SQL Server 2005 with the SET NOCOUNT ON.
----------------------------------------------------------------------------------------------------------------------
-- ================================================
-- Template generated from Template Explorer using:
-- Create Procedure (New Menu).SQL
--
-- Use the Specify Values for Template Parameters
-- command (Ctrl-Shift-M) to fill in the parameter
-- values below.
--
-- This block of comments will not be included in
-- the definition of the procedure.
-- ================================================
SET ANSI_NULLS ON
GO
SET QUOTED_IDENTIFIER ON
GO
-- =============================================
-- Author: <Author,,Name>
-- Create date: <Create Date,,>
-- Description: <Description,,>
-- =============================================
CREATE PROCEDURE <Procedure_Name, sysname, ProcedureName>
-- Add the parameters for the stored procedure here
<@Param1, sysname, @p1> <Datatype_For_Param1, , int> = <Default_Value_For_Param1, , 0>,
<@Param2, sysname, @p2> <Datatype_For_Param2, , int> = <Default_Value_For_Param2, , 0>
AS
BEGIN
-- SET NOCOUNT ON added to prevent extra result sets from
-- interfering with SELECT statements.
SET NOCOUNT ON;

-- Insert statements for procedure here
SELECT <@Param1, sysname, @p1>, <@Param2, sysname, @p2>
END
GO
---------------------------------------------------------------------------------------------
As you can see even simple little things such as this can make an overall improvement for your 
database environment. Stay tuned for other simple tricks and techniques to improve performance.

Wednesday, 3 February 2016

BEGIN TRAN, ROLLBACK TRAN, and COMMIT TRAN

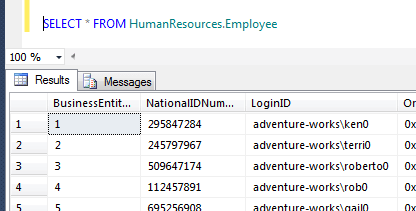
When creating a SQL Statement by default, for example, SELECT * FROM HumanResources.Employee, SQL Server will run this statement and immediately return the results:
What does BEGIN TRAN, ROLLBACK TRAN, and COMMIT TRAN mean?
If you were to add BEGIN TRANSACTION (or BEGIN TRAN) before the statement it automatically makes the transaction explicit and holds a lock on the table until the transaction is either committed or rolled back.
BEGIN TRANSACTION marks the starting point of an explicit, local transaction. - MS
For example, when I issue a DELETE or UPDATE statement I always explicitly use BEGIN TRAN to make sure my statement is correct and I get the correct number of results returned.
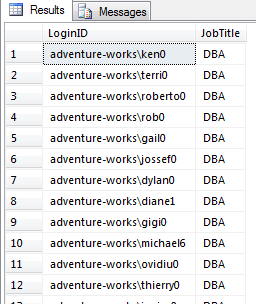
Let’s say I want to UPDATE the Employee table and set JobTitle equal to 'DBA' where LoginID is like '%barbara%'. I accidentally create my statement wrong and issue the statement below which actually would make every JobTitle equal to 'DBA':
----------------------------------------------------------------------
 UPDATE HumanResources.Employee
        SET JobTitle = ‘DBA’
        WHERE LoginID IN (
        SELECT LoginID FROM HumanResources.Employee)
----------------------------------------------------------------------

I accidentally made every record have a JobTitle of DBA
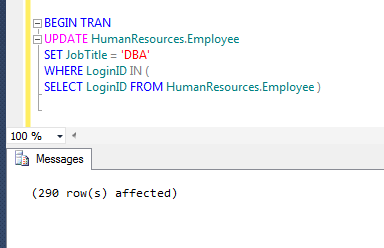
Oops! I didn’t mean to do that!! I accidentally made every record have a JobTitle of DBA. If I would have placed a BEGIN TRAN before my statement I would have noticed that 290 results would be effected and something is wrong with my statement:
If I would have placed a BEGIN TRAN before my statement I would have noticed that 290 results would be effected and something is wrong with my statement
Since I specified a BEGIN TRAN, the transaction is now waiting on a ROLLBACK or COMMIT. While the transaction is waiting it has created a lock on the table and any other processes that are trying to access HumanResources.Employee are now being blocked. Be careful using BEGIN TRAN and make sure you immediately issue a ROLLBACK or COMMIT:
Since I specified a BEGIN TRAN, the transaction is now waiting on a ROLLBACK or COMMIT
As you can see, SPID 52 is getting blocked by 54.
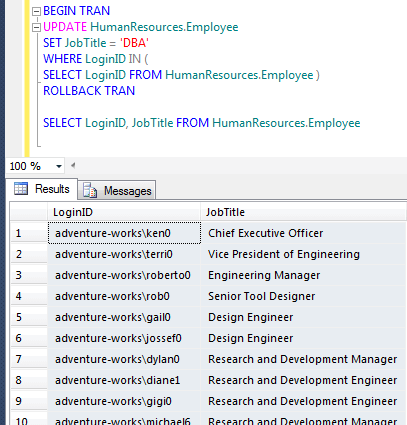
Since I noticed something was terribly wrong with my UPDATE statement, I can issue a ROLLBACK TRAN statement to rollback the transaction meaning that none of the data actually changed:
ROLLBACK TRANSACTION rolls back an explicit or implicit transaction to the beginning of the transaction, or to a savepoint inside the transaction. It also frees resources held by the transaction. - MS
As you can see, SPID 52 is getting blocked by 54.
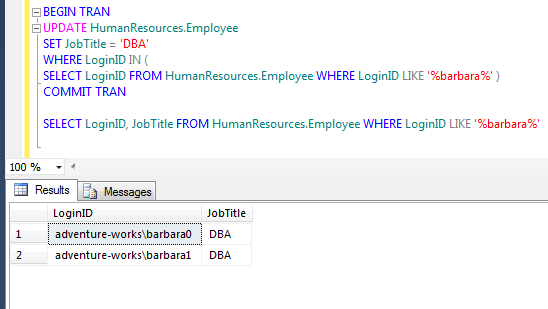
If I had written my statement correct the first time and noticed the right amount of results displayed then I could issue a COMMIT TRAN and it would execute the statement and my changes would be committed to the database:
COMMIT TRANSACTION marks the end of a successful implicit or explicit transaction. If @@TRANCOUNT is 1, COMMIT TRANSACTION makes all data modifications performed since the start of the transaction a permanent part of the database, frees the resources held by the transaction, and decrements @@TRANCOUNT to 0. If @@TRANCOUNT is greater than 1, COMMIT TRANSACTION decrements @@TRANCOUNT only by 1 and the transaction stays active. - MS
It would execute the statement and my changes would be committed to the database.